Last Halloween, I spent hours making fancy little appetizers that no one even looked at. Total letdown. Out of desperation, I threw together a pumpkin cheese ball in about twenty minutes, just to have something else on the table.
And of course—that’s what everyone went for. The pumpkin cheese ball was gone before I even poured myself a drink, and three neighbors asked me for the recipe on the spot. Now it’s my go-to for fall gatherings. Simple, cute, and always a hit.

❤️ Why You’ll Love This Recipe
Look, I’m not winning any culinary awards here but this thing is foolproof. You literally just mix stuff together and roll it in cheese – my 8-year-old could make this blindfolded. Everyone thinks you’re some kind of hostess genius when really you just spent 15 minutes making a mess in your kitchen. Plus it tastes way better the next day, so you can make it while binge-watching Netflix and call it meal prep.
Print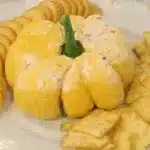
Pumpkin Cheese Ball
- Total Time: 20 minutes
- Yield: 1 large cheese ball 1x
Description
This adorable Pumpkin Cheese Ball for your fall gatherings! Easy make-ahead appetizer with creamy ranch flavors and stunning pumpkin presentation.
Ingredients
Base & Binder:
- 8 oz block cream cheese, softened (the real stuff, not that whipped nonsense)
- 8 oz vegetable cream cheese, softened (found near the regular cream cheese, different brand sometimes)
- 2 tbsp ranch seasoning mix (spicy if you’re brave, original if you’re boring like me)
- 3 green onions, thinly sliced (just the green parts – white parts are too sharp)
- 1 red bell pepper, finely diced (don’t throw away that stem – we need it!)
Cheese Coating:
- 2 cups freshly shredded sharp cheddar cheese, divided (buy the block and shred it yourself, seriously)
For Serving:
- Whatever crackers are on sale
- Cut up vegetables if you’re feeling healthy
- Wine for the cook (most important ingredient)
Instructions
Step 1: Beat the Cheese Into Submission Throw both cream cheeses into your mixer and beat the hell out of them for like 3 minutes. I mean really go to town – you want zero lumps or people will judge your cheese ball forever.
Step 2: Add All the Good Stuff Dump in your ranch powder, chopped green onions, red pepper bits, and 1 cup of that shredded cheddar. Mix it until it looks like a colorful mess. Taste it (this is mandatory) and adjust seasoning if needed.
Step 3: Shape This Monster Lay out plastic wrap and sprinkle some cheddar in the middle. Plop your cheese mixture on top and wrap it up like you’re wrapping the world’s most delicate present. Smoosh it into a ball shape with your hands – it doesn’t have to be perfect, pumpkins aren’t perfect either.
Step 4: More Cheese Please Roll that plastic-wrapped ball in the remaining cheddar until it looks like a cheese-crusted bowling ball. This is where kids lose their minds with excitement. Double wrap it or you’ll hate yourself later.
Step 5: Make It Look Like an Actual Pumpkin Here’s where the magic happens – take 4 rubber bands and wrap them around the ball to create sections, like you’re dividing up an orange. Don’t make them too tight or cheese will squish out the sides and you’ll have a mess.
Step 6: The Waiting Game Stick it in the fridge for at least 2 hours but honestly overnight is better. This is the hardest part because you just want to eat it immediately. The waiting firms everything up and lets the flavors hang out together.
Step 7: The Big Reveal Carefully remove the plastic wrap and rubber bands – this is like unwrapping a present. Stick that red pepper stem right in the top and prepare for people to lose their absolute minds over how cute it is.
Notes
Spicy Version: Add cayenne or swap to jalapeño cream cheese if you want heat. My brother-in-law adds hot sauce directly to his – chaos, but it works.
Garden Fresh: Throw in fresh herbs like chives or dill. Makes it taste fancier than it actually is.
Smoky Fall: Smoked paprika transforms this completely. Just a teaspoon gives it that cozy campfire vibe.
Sweet Surprise: Dried cranberries sound weird but trust me. The sweet-salty combo is addictive.
- Prep Time: 20 minutes
- Category: Appetizer
- Method: No-bake
- Cuisine: American
Nutrition
- Serving Size: About 2-3 tablespoons
- Calories: 185 per serving
- Sugar: 2g
- Sodium: 320mg
- Fat: 16g
- Saturated Fat: 10g
- Unsaturated Fat: 5g
- Trans Fat: 0g
- Carbohydrates: 4g
- Fiber: 0g
- Protein: 7g
- Cholesterol: 45mg
📝 Ingredient List
Base & Binder:
- 8 oz block cream cheese, softened (the real stuff, not that whipped nonsense)
- 8 oz vegetable cream cheese, softened (found near the regular cream cheese, different brand sometimes)
- 2 tbsp ranch seasoning mix (spicy if you’re brave, original if you’re boring like me)
- 3 green onions, thinly sliced (just the green parts – white parts are too sharp)
- 1 red bell pepper, finely diced (don’t throw away that stem – we need it!)
Cheese Coating:
- 2 cups freshly shredded sharp cheddar cheese, divided (buy the block and shred it yourself, seriously)
For Serving:
- Whatever crackers are on sale
- Cut up vegetables if you’re feeling healthy
- Wine for the cook (most important ingredient)
🔍 Why These Ingredients Work
Okay so I accidentally discovered the vegetable cream cheese thing when I grabbed the wrong package at Kroger. Turns out it’s way less heavy than using two regular cream cheese blocks – doesn’t sit in your stomach like a brick. The ranch packet is basically cheating but who cares? It gives it that “what’s in this?” flavor that keeps people coming back.
The red pepper isn’t just for looks (though it is pretty) – those little crunchy bits break up all that creamy richness. When I first made this I used yellow pepper because that’s what I had, but red photographs way better for Instagram. Green onions add that fresh bite so it doesn’t taste like you just ate a stick of butter covered in cheese powder.
Essential Tools and Equipment
- Big mixing bowl or stand mixer (I use my KitchenAid because I’m fancy like that)
- Sharp knife that actually cuts things
- Tons of plastic wrap (buy the good stuff, not dollar store garbage)
- 4 rubber bands from that junk drawer everyone has
- A platter that makes you look like you have your life together
- Paper towels because this gets messy
👩 How To Make Pumpkin Cheese Ball
Step 1: Beat the Cheese Into Submission Throw both cream cheeses into your mixer and beat the hell out of them for like 3 minutes. I mean really go to town – you want zero lumps or people will judge your cheese ball forever.
Step 2: Add All the Good Stuff Dump in your ranch powder, chopped green onions, red pepper bits, and 1 cup of that shredded cheddar. Mix it until it looks like a colorful mess. Taste it (this is mandatory) and adjust seasoning if needed.
Step 3: Shape This Monster Lay out plastic wrap and sprinkle some cheddar in the middle. Plop your cheese mixture on top and wrap it up like you’re wrapping the world’s most delicate present. Smoosh it into a ball shape with your hands – it doesn’t have to be perfect, pumpkins aren’t perfect either.
Step 4: More Cheese Please Roll that plastic-wrapped ball in the remaining cheddar until it looks like a cheese-crusted bowling ball. This is where kids lose their minds with excitement. Double wrap it or you’ll hate yourself later.
Step 5: Make It Look Like an Actual Pumpkin Here’s where the magic happens – take 4 rubber bands and wrap them around the ball to create sections, like you’re dividing up an orange. Don’t make them too tight or cheese will squish out the sides and you’ll have a mess.
Step 6: The Waiting Game Stick it in the fridge for at least 2 hours but honestly overnight is better. This is the hardest part because you just want to eat it immediately. The waiting firms everything up and lets the flavors hang out together.
Step 7: The Big Reveal Carefully remove the plastic wrap and rubber bands – this is like unwrapping a present. Stick that red pepper stem right in the top and prepare for people to lose their absolute minds over how cute it is.

Tips from Well-Known Chefs
My neighbor Janet (who thinks she’s Martha Stewart) says the secret is using room temperature everything. She’s actually right about this one, even though she’s wrong about most other kitchen stuff.
❗ You Must Know
Cold cream cheese will ruin your life. I’m dead serious – if that cream cheese isn’t soft, you’ll get lumps that no amount of beating will fix. Pull it out an hour before you start or microwave it in 15-second bursts. Don’t get impatient and overdo the microwave or you’ll have cream cheese soup.
Personal Secret: I make two every time now. One for whatever party I’m going to, and one that mysteriously disappears from my fridge by the next morning. My husband claims ignorance but there’s cheddar evidence on his beard.
💡 Pro Tips & Cooking Hacks
Shred your own cheddar from a block or the coating will fall off like dandruff. Pre-shredded cheese has some kind of anti-stick coating that defeats the whole purpose. I learned this when my first attempt looked like it had cheese mange.
Wrap that thing like your life depends on it before adding rubber bands. First time I made this, I was lazy with the plastic wrap and ended up with cheese explosion all over my fridge. Took me 20 minutes to clean up that disaster.
Buy multiple red peppers because stems are fragile little jerks. You’ll be so proud of your perfect pumpkin and then the stem will snap when you try to stick it in. Murphy’s Law of cheese balls.
Let it come to room temp before serving – cold cheese balls are sad and nobody wants to spread concrete on their crackers.
🎨 Flavor Variations & Suggestions
Spicy Version: Add cayenne or swap to jalapeño cream cheese if you want heat. My brother-in-law adds hot sauce directly to his – chaos, but it works.
Garden Fresh: Throw in fresh herbs like chives or dill. Makes it taste fancier than it actually is.
Smoky Fall: Smoked paprika transforms this completely. Just a teaspoon gives it that cozy campfire vibe.
Sweet Surprise: Dried cranberries sound weird but trust me. The sweet-salty combo is addictive.
⏲️ Make-Ahead Options
This is basically the holy grail of make-ahead appetizers. You can make it 3 days early and it actually gets better sitting in the fridge – all those flavors meld together and become best friends. Perfect for when you’re hosting and need to get your act together ahead of time.
If you’re feeding a crowd, make several smaller ones instead of one giant monster. They’re easier to transport and honestly look cuter lined up on a platter like little pumpkin babies. Plus people don’t have to fight over the good parts.
Recipe Notes & Baker’s Tips
The vegetable cream cheese might seem like an unusual choice, but it adds a lovely subtle flavor that complements the ranch seasoning without competing with it. If you can’t find it, regular cream cheese works perfectly fine – you’ll just have a slightly tangier final result.
Don’t stress if your pumpkin isn’t perfectly round – real pumpkins aren’t either! Embrace the rustic, homemade charm.
🍽️ Serving Suggestions
This gorgeous pumpkin cheese ball is stunning on a wooden cutting board surrounded by an array of crackers – think water crackers, buttery Ritz, and maybe some seeded artisan crackers for variety. Add some fresh vegetables like baby carrots, celery sticks, and colorful bell pepper strips for crunch and color contrast.
For an extra special touch, arrange everything on a bed of fall leaves (clean ones!) or scatter some mini pumpkins and gourds around your serving area. A little autumn ambiance never hurt anyone!
Sign Off
This little pumpkin guy will become your fall party MVP, guaranteed! Nothing beats food that makes people smile before they even taste it. Happy hosting, and may your cheese balls always be perfectly ridged! 🍽️
🧊 How to Store Your Pumpkin Cheese Ball
Refrigerator: Store covered for up to 5 days. Let it come to room temperature for 20-30 minutes before serving for the best texture.
Freezing: While you technically can freeze this for up to a month, the texture changes a bit upon thawing, so I recommend enjoying it fresh for the best experience.
Serving Day: Once it’s at room temperature on your serving table, it’s good for about 2 hours before you should refrigerate any leftovers (though trust me, there rarely are any!).
⚠️ Allergy Information
This recipe contains dairy (cream cheese and cheddar cheese). For dairy-free alternatives, try using dairy-free cream cheese alternatives and nutritional yeast or dairy-free cheddar shreds for coating.
The ranch seasoning mix may contain gluten depending on the brand – check labels if you’re serving guests with gluten sensitivities.
❓ Questions I Get Asked A Lot
Can I use original ranch instead of spicy ranch mix? Absolutely! Original ranch seasoning works beautifully – you just won’t have that little kick of heat that the spicy version provides.
How far ahead can I make this pumpkin cheese ball? You can make this up to 3 days in advance! It actually gets better with time as the flavors meld together.
What if I can’t find vegetable cream cheese? Regular cream cheese works perfectly fine. You might have a slightly tangier result, but it will still be delicious!
Can I make mini pumpkin cheese balls instead of one large one? What a cute idea! Yes, you can divide the mixture and make several small ones. They’re perfect for individual servings and look adorable on a platter.
Why won’t my cheddar coating stick properly? Make sure you’re using freshly shredded cheddar rather than pre-shredded. The anti-caking agents in pre-shredded cheese prevent it from adhering properly.
How long should I let it sit out before serving? About 20-30 minutes at room temperature gives you the perfect creamy texture that’s easy to spread but not too soft.
💬 Tried this recipe? I’d love to see your adorable pumpkin creations! Leave a comment and rating below, and don’t forget to share photos of your pumpkin cheese ball on social media – tag me so I can admire your handiwork!