I tried butternut squash mac and cheese for the first time last October, thanks to my neighbor who showed up with a pan after her kid’s soccer game. I wasn’t expecting much… and then one bite in, I got it. Creamy, cozy, just the right touch of sweetness—it made regular mac and cheese feel like the bland cousin.
Now it’s a total go-to in my kitchen. My kids think it’s just cheesy pasta (they have no clue they’re eating squash), and last weekend my brother-in-law asked for the recipe between mouthfuls. That’s always a good sign.
❤️ Why You’ll Love This Recipe
Listen, I’ve tried dozens of mac variations, but this butternut squash version hits different. The squash makes everything ridiculously creamy without needing tons of heavy cream, plus that natural sweetness plays so well with sharp cheddar and smoky gouda. My picky eater actually asks for “the orange mac” now.
The color alone makes this perfect for fall gatherings. And honestly? Knowing there’s actual vegetables mixed in makes me feel way less guilty when I go back for seconds (okay, thirds).
Print
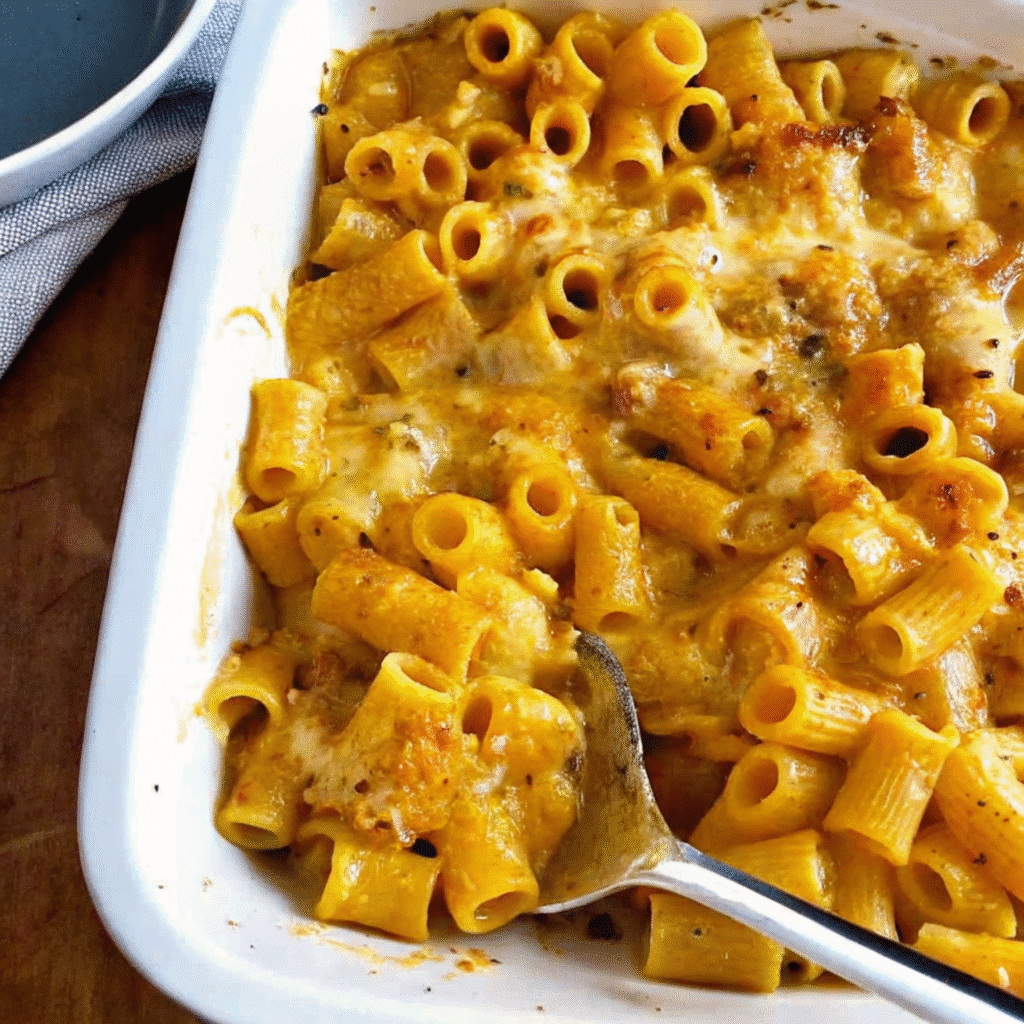
Butternut Squash Mac and Cheese
- Total Time: 1 hour 15 minutes
- Yield: One 2-quart casserole 1x
Description
reamy, dreamy butternut squash mac and cheese combining the comfort of classic mac and cheese with sweet, nutty fall flavors. Made with a rich three-cheese blend and perfectly roasted butternut squash.
Ingredients
For the Mac and Cheese:
- 1 lb elbow macaroni (any short pasta works)
- 2–3 lbs butternut squash (or 2 cups if using prepared)
- 4 tablespoons butter
- 1/4 cup flour
- 3 cups whole milk (room temp)
- 2 cups sharp cheddar, grated
- 1 cup smoked gouda, grated
- 1/2 cup parmesan, grated
- 1/2 teaspoon nutmeg
- 1/4 teaspoon Tabasco
- Salt and pepper
For the Top:
- 1/2 cup extra sharp cheddar
- 1/4 cup extra smoked gouda
Instructions
Step 1: Get Your Squash Ready Okay, so you’ve got options here and I’m not gonna lie – I usually just microwave mine because who has time? Pierce a whole squash with a fork like 8 times and nuke it for 20-30 minutes. If you’re fancy and want to roast it, cut in half, scrape out the guts, and bake at 350°F for 90 minutes. Got pre-cut squash from the store? Microwave those chunks for 15 minutes.
Scoop out all the flesh and mash it up. Don’t make it baby food smooth – leave some texture. You want about 2 cups worth.
Step 2: Pasta Time Boil your noodles like normal. I always salt my water heavy – like seawater salty. Cook till they’re still got a tiny bite left because they’ll finish cooking in the oven. Drain and toss with a little butter so they don’t stick together.
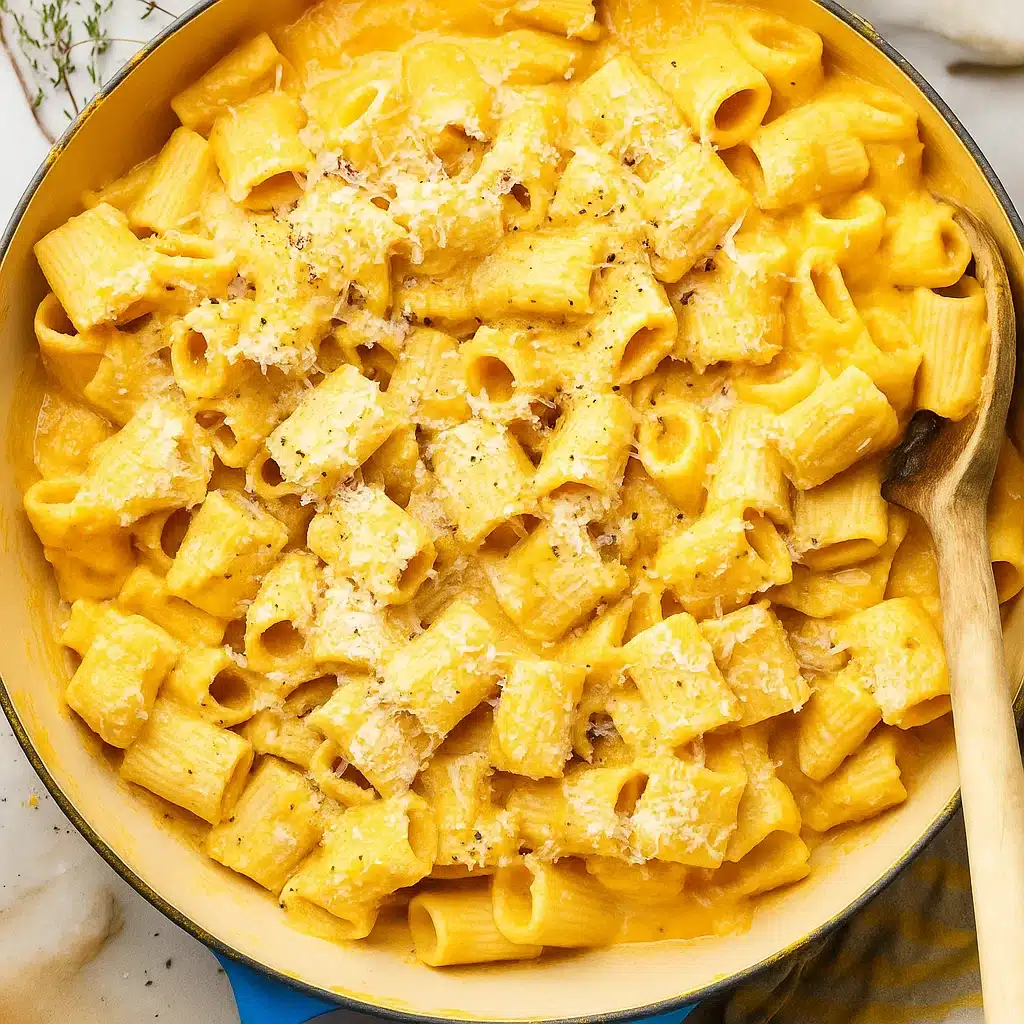
Step 3: Cheese Sauce Magic Melt butter in a saucepan over medium heat. Whisk in flour and let it cook for 2 minutes – smells nutty when it’s ready. Pour in your milk slowly while whisking like crazy. Nobody wants lumps, trust me.
Keep stirring and let it bubble gently for about 5-7 minutes till it coats your spoon.
Step 4: Add the Good Stuff Stir in your mashed squash, nutmeg, few drops of Tabasco, salt and pepper. Let it hang out for 2-3 minutes so everything gets friendly.
Step 5: Cheese Goes In Take the pan off heat first! Then stir in all your cheese gradually. I learned this the hard way – hot pan = stringy cheese sauce. Stir till smooth and taste it. Need more salt? Add it now.
Step 6: Put It All Together Heat oven to 350°F. Grease your baking dish good. Mix pasta and sauce till every noodle is coated. Dump into dish, top with extra cheese.
Notes
Fresh grated cheese melts way better than bagged stuff. Those powder coatings make things weird and grainy.
Frozen butternut squash works fine when you’re rushed. Just thaw it and squeeze out extra water first.
Don’t let it boil once cheese goes in. Keep it barely bubbling or you’ll get stringy mess.
Stir in some cream cheese for extra richness if you want to go crazy.
- Prep Time: 30 minutes
- Cook Time: 45 minutes
- Category: Main Dish
- Method: Baking
- Cuisine: American
Nutrition
- Serving Size: 1 cup
- Calories: 485
- Sugar: 8g
- Sodium: 680mg
- Fat: 22g
- Saturated Fat: 14g
- Unsaturated Fat: 6g
- Trans Fat: 0g
- Carbohydrates: 52g
- Fiber: 4g
- Protein: 20g
- Cholesterol: 65mg
📝 Ingredient List
For the Mac and Cheese:
- 1 lb elbow macaroni (any short pasta works)
- 2-3 lbs butternut squash (or 2 cups if using prepared)
- 4 tablespoons butter
- 1/4 cup flour
- 3 cups whole milk (room temp)
- 2 cups sharp cheddar, grated
- 1 cup smoked gouda, grated
- 1/2 cup parmesan, grated
- 1/2 teaspoon nutmeg
- 1/4 teaspoon Tabasco
- Salt and pepper
For the Top:
- 1/2 cup extra sharp cheddar
- 1/4 cup extra smoked gouda
Quick substitution tip: No smoked gouda? Use regular gouda or extra sharp cheddar. Bagged cheese works fine too.
🔍 Why These Ingredients Work
Here’s the deal with this cheese combo – each one has a job. Sharp cheddar brings that tangy bite we expect from mac and cheese. Smoked gouda? That’s your secret weapon for depth and that “what IS that amazing flavor” moment. Parmesan adds the salty, nutty finish that ties it all together.
That pinch of nutmeg isn’t random – it makes the butternut squash taste more like itself, if that makes sense. And don’t skip the Tabasco drops! Just a tiny bit wakes everything up without making it spicy. The mashed butternut squash works double duty as flavor and natural thickener.
Essential Tools and Equipment
- Big pot for pasta
- Medium pan for sauce
- Whisk
- Potato masher
- 2-quart baking dish
- Foil
- Cheese grater
👩🍳How To Make Butternut Squash Mac and Cheese
Step 1: Get Your Squash Ready Okay, so you’ve got options here and I’m not gonna lie – I usually just microwave mine because who has time? Pierce a whole squash with a fork like 8 times and nuke it for 20-30 minutes. If you’re fancy and want to roast it, cut in half, scrape out the guts, and bake at 350°F for 90 minutes. Got pre-cut squash from the store? Microwave those chunks for 15 minutes.
Scoop out all the flesh and mash it up. Don’t make it baby food smooth – leave some texture. You want about 2 cups worth.
Step 2: Pasta Time Boil your noodles like normal. I always salt my water heavy – like seawater salty. Cook till they’re still got a tiny bite left because they’ll finish cooking in the oven. Drain and toss with a little butter so they don’t stick together.
Step 3: Cheese Sauce Magic Melt butter in a saucepan over medium heat. Whisk in flour and let it cook for 2 minutes – smells nutty when it’s ready. Pour in your milk slowly while whisking like crazy. Nobody wants lumps, trust me.
Keep stirring and let it bubble gently for about 5-7 minutes till it coats your spoon.
Step 4: Add the Good Stuff Stir in your mashed squash, nutmeg, few drops of Tabasco, salt and pepper. Let it hang out for 2-3 minutes so everything gets friendly.
Step 5: Cheese Goes In Take the pan off heat first! Then stir in all your cheese gradually. I learned this the hard way – hot pan = stringy cheese sauce. Stir till smooth and taste it. Need more salt? Add it now.
Step 6: Put It All Together Heat oven to 350°F. Grease your baking dish good. Mix pasta and sauce till every noodle is coated. Dump into dish, top with extra cheese.
Cover with foil, bake 20 minutes. Pull off foil, bake another 10-20 minutes till bubbly and golden on top. Let it sit 5 minutes before diving in or you’ll burn your tongue.
Tips from Well-Known Chefs
My friend who went to culinary school always says season as you go, not just at the end. So taste your squash mash, taste your sauce before cheese, taste everything. Makes a huge difference.
❗ You Must Know
Cold milk in hot roux = disaster. Learned this when my first batch turned into chunky mess. Let your milk sit out for 30 minutes or warm it up in microwave for 30 seconds.
My secret trick: Save half a cup of pasta water before draining. If your cheese sauce gets too thick, splash some of that starchy water in. Works every time.
💡 Pro Tips & Cooking Hacks
- Fresh grated cheese melts way better than bagged stuff. Those powder coatings make things weird and grainy.
- Frozen butternut squash works fine when you’re rushed. Just thaw it and squeeze out extra water first.
- Don’t let it boil once cheese goes in. Keep it barely bubbling or you’ll get stringy mess.
- Stir in some cream cheese for extra richness if you want to go crazy.
🎨 Flavor Variations / Suggestions
Add some meat: Crumbled bacon, leftover rotisserie chicken, or cooked sausage make this more filling.
More veggies: Sautéed mushrooms or caramelized onions are really good mixed in.
Spice it up: Throw in some diced jalapeños if you like heat.
Herb it up: Fresh sage at the end is fancy restaurant stuff.
Different squash: Acorn squash or sweet potato work too if that’s what you’ve got.
⏲️ Make-Ahead Options
You can put this whole thing together 2 days early and just stick it in the fridge covered. Add extra 10-15 minutes when you bake it since it’s cold.
The cheese sauce keeps in the fridge for 3 days by itself. Just warm it up slow and add milk if it gets thick.
Want to freeze it? Make the whole thing but don’t bake. Wrap tight, freeze up to 3 months. Thaw overnight before baking.
Recipe Notes & Baker’s Tips
Picking squash: Heavy for its size, no soft spots, dry stem. Shiny skin means it’s not ripe yet.
Don’t mess with the cheese amounts – I tested this ratio like 10 times to get it right.
Leftovers reheat great in the oven with a splash of milk. Microwave works but stir it a lot.
🍽️ Serving Suggestions
Goes perfect with roasted chicken, pork, or just a simple salad. For Thanksgiving it beats the usual boring sides.
Sprinkle some chives on top, little smoked paprika, or toasted pumpkin seeds for crunch.
Hope this becomes your go-to when you want something cozy and different. Nothing beats watching people’s faces when they taste it for the first time.
Happy cooking! 🍽️
🧊 How to Store Your Butternut Squash Mac and Cheese
Fridge: Cover it, lasts 4 days. Reheat in oven at 350°F with some milk, or microwave portions.
Freezer: Portion it out, freeze up to 3 months. Thaw overnight in fridge before reheating.
Best reheating: Oven method keeps the texture better – 350°F for 20-25 minutes covered, add milk if it looks dry.
⚠️ Allergy Information
Contains: Dairy, gluten, eggs (if using egg pasta)
Dairy-Free Substitutions: Use vegan butter, unsweetened cashew milk, and your favorite dairy-free cheese blend. Nutritional yeast adds extra cheesy flavor!
Gluten-Free: Simply swap regular pasta for your favorite gluten-free variety and use gluten-free flour for the roux.
❓ Questions I Get Asked A Lot
Can I use canned butternut squash puree?
Absolutely! Use about 1.5 cups of puree and drain any excess liquid first.
Why is my cheese sauce grainy?
Usually from overheating after adding cheese, or using pre-shredded cheese. Keep temperature low and use freshly grated cheese.
Can I make this without baking it?
Yes! Just serve the stovetop version immediately after mixing pasta and sauce. The baking step adds a golden top and melds flavors.
How do I know when the butternut squash is done cooking?
It should be completely tender when pierced with a fork – no resistance at all!
Can I double this recipe?
Definitely! Use a 9×13 inch baking dish and add 10-15 minutes to the baking time.
💬 Tried this recipe? Leave a comment and rating below! I love hearing about your kitchen adventures and any creative twists you added. Did you try the bacon variation? Add some extra spice? Share your photos and tag me – there’s nothing that makes my day like seeing your delicious creations!