Description
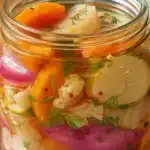
Homemade refrigerator pickled vegetables with no canning required! This easy recipe transforms fresh vegetables into flavorful pickles in just 24 hours.
Ingredients
For the Vegetables (2 lbs mixed):
-
- Cauliflower head, chopped into florets
-
- Green beans, ends trimmed off
-
- 3–4 carrots, sliced however you want
-
- 4–5 small cucumbers, sliced
-
- Red bell pepper, cut in strips
-
- Sweet onion, sliced thin
-
- Whatever else looks good: asparagus, radishes, beets
For the Flavor Stuff:
-
- 6–8 dill sprigs (fresh, not dried)
-
- 6–8 garlic cloves, peeled
-
- 2 tsp celery seeds
-
- 2 tsp coriander seeds
-
- 2 tsp mustard seeds
-
- 2 tsp black peppercorns
-
- 1–2 hot peppers if you want heat
For the Brine:
-
- 2 cups white vinegar
-
- 4 cups water
-
- ¼ cup sugar
-
- 2 tablespoons kosher salt
Instructions
Step 1: Prep Your Vegetables (15 minutes) Chop everything up how you like to eat it. I do carrots in coins because they’re perfect for snacking, but strips work great for sandwiches. Make sure everything’s completely dry—wet veggies make watery pickles, and nobody wants that.
Step 2: Pack Those Jars (10 minutes) Start with dill at the bottom of each jar, then toss in your garlic and spices. Don’t overthink the amounts—I eyeball about half a teaspoon of each spice per jar. Pack your veggies in tight but don’t crush them. If you want heat, now’s when you add that jalapeño.
Step 3: Make the Brine (10 minutes) Boil water with the garlic cloves for 5 minutes first—this step is crucial for mellow garlic flavor. Add everything else, boil until the salt and sugar disappear, then kill the heat. The brine should taste like pickle juice you’d actually want to drink.
Step 4: Pour and Wait Pour that hot brine over your veggies, leaving some room at the top. The hot liquid does something magical—it slightly softens the veggies while keeping them crisp. Let them cool completely before you lid them up.
Step 5: Patience (Sort Of) Into the fridge they go. You can totally sneak a taste after a few hours, but they’re legit ready after overnight chilling. The flavors keep getting better for days.
Notes
Don’t stress about perfection with this recipe. Missing a spice? Use what you have. Want more tang? Add more vinegar. Prefer it sweeter? More sugar. I’ve messed up these ratios so many times and they still turn out great. The vegetables will tell you what they need—if they taste bland after a day, your brine was too weak. If they’re too salty, add some water. It’s very forgiving.
- Category: Condiment
- Method: Quick Pickling
- Cuisine: American
Nutrition
- Serving Size: ½ cup
- Calories: 25 per serving
- Sugar: 4g
- Sodium: 480mg
- Fat: 0g
- Saturated Fat: 0g
- Trans Fat: 0g
- Carbohydrates: 6g
- Fiber: 322g
- Protein: 1g
- Cholesterol: 0mg