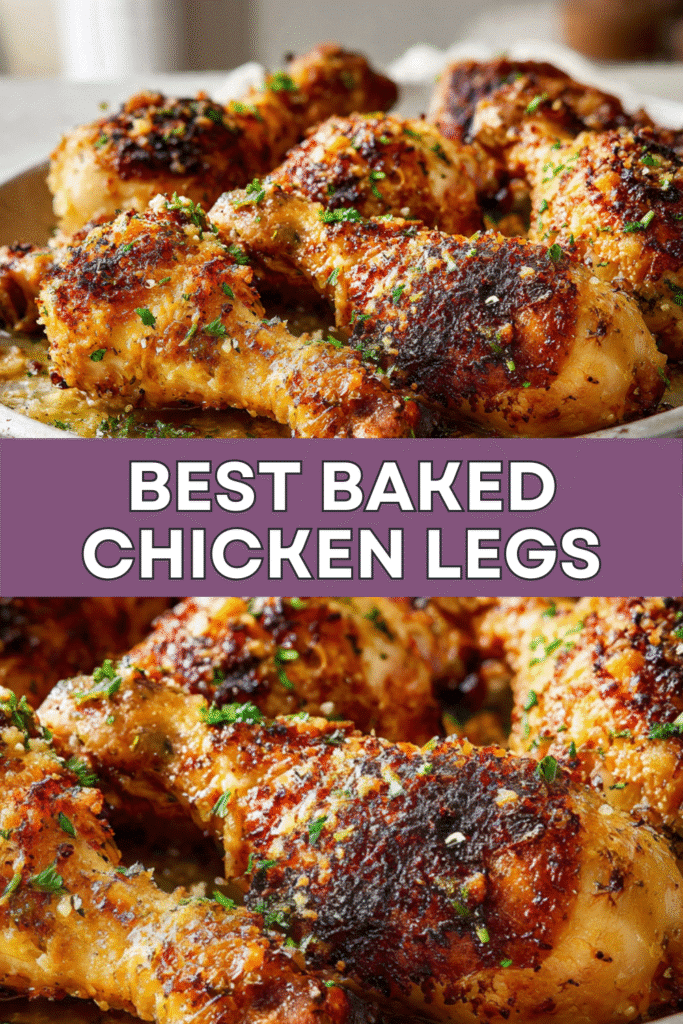
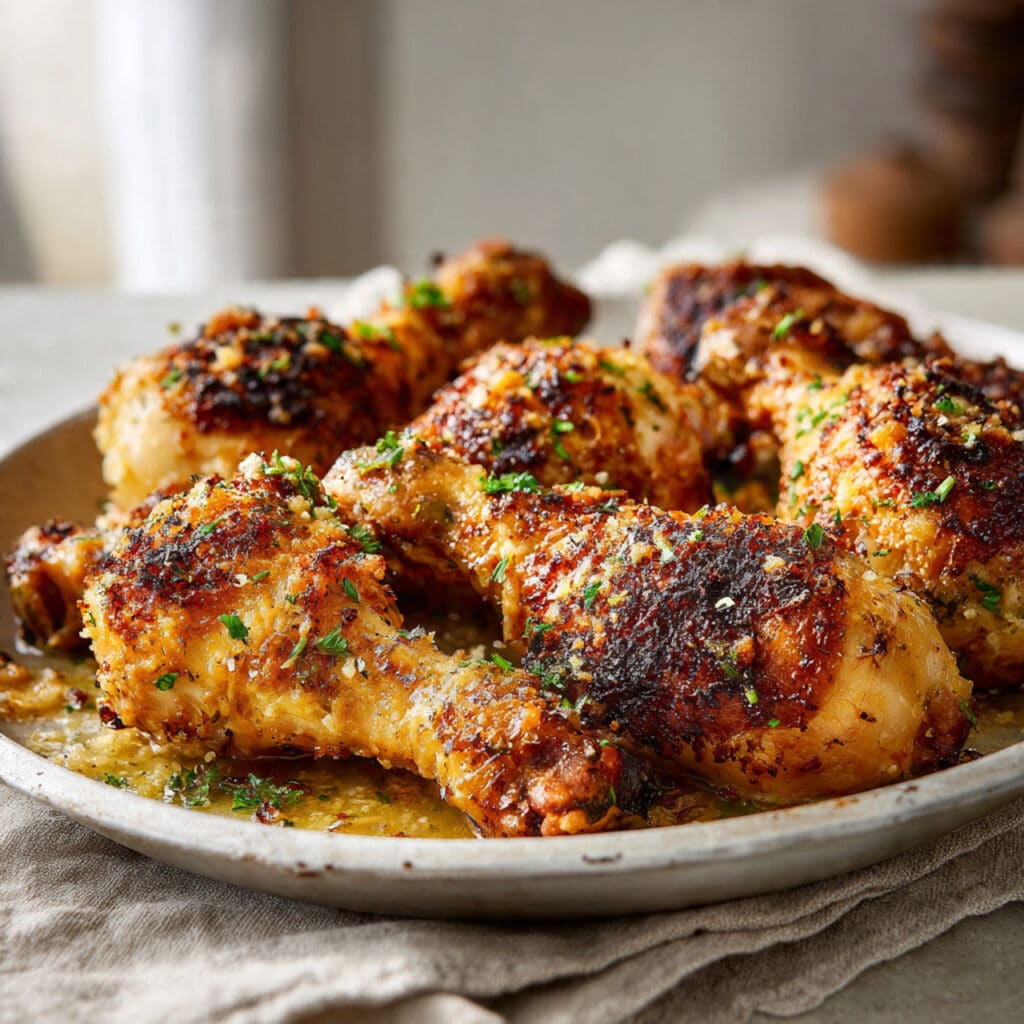
Garlic Parmesan Chicken Legs turn budget-friendly drumsticks into a family favorite dinner. These crispy-skinned chicken legs get coated in a garlicky parmesan butter sauce that makes everyone reach for seconds. The best part is they bake hands-free in the oven while you handle homework, laundry, or whatever else life throws at you.
Love More Recipes? Try My Baked Chicken Legs with Herbs or this Honey Garlic Slow Cooker Chicken Thighs next.
Why You’ll Love This Recipe
- Budget-friendly using inexpensive chicken drumsticks
- Crispy skin without any deep frying or mess
- Bold garlic parmesan flavor that beats takeout wings
- Kid-approved with easy-to-hold drumstick handles
- Minimal hands-on time with the oven doing most of the work
Equipment Needed
- Large baking sheet
- Wire cooling rack (optional but recommended)
- Aluminum foil or parchment paper
- Small saucepan
- Large mixing bowl
- Basting brush

Garlic Parmesan Chicken Legs
- Total Time: 55 minutes
- Yield: 4 servings 1x
Description
These crispy garlic parmesan chicken legs turn budget-friendly drumsticks into family favorite dinner. Bake hands-free in the oven until crispy-skinned, then coat in garlicky parmesan butter sauce. Kids love the built-in handles and adults love the bold flavor without fuss.
Ingredients
- 8 chicken drumsticks
- 1 tbsp olive oil or melted butter
- 2 tsp garlic powder
- 2 tsp onion powder
- 2 tsp salt
- 1 tsp paprika
- 1 tsp dried Italian herbs
- 1/2 tsp black pepper
- 1/2 cup unsalted butter
- 4 cloves fresh garlic, minced
- 2 tbsp fresh parsley, chopped
- 1 tbsp lemon juice
- 1/2 cup grated Parmesan cheese
Instructions
1. Preheat oven to 400°F and line large baking sheet with aluminum foil. Place wire cooling rack on top if you have one for crispier skin. Pat drumsticks completely dry with paper towels.
2. Mix garlic powder, onion powder, salt, paprika, Italian herbs, and black pepper in large bowl. Drizzle drumsticks with olive oil or melted butter, toss in seasoning until evenly coated.
3. Arrange seasoned drumsticks on prepared baking sheet leaving space between each. Don’t let them touch or they’ll steam instead of crisp. Bake 35 minutes without opening oven door.
4. While chicken bakes, melt butter in small saucepan over medium heat. Add minced garlic and sauté 1-2 minutes until fragrant but not browned. Remove from heat, stir in chopped parsley and lemon juice.
5. Remove drumsticks from oven and brush generously with garlic butter. Return to oven and bake 5 more minutes. Repeat brushing process one more time for extra flavor.
6. Remove drumsticks from oven and immediately sprinkle with grated Parmesan cheese while hot. Cheese will melt slightly and stick to buttery skin.
7. Let drumsticks rest 5 minutes before serving. Save any leftover garlic butter for dipping bread or vegetables.
Notes
Pat drumsticks completely dry for crispiest skin possible.
Use wire rack for maximum air circulation and even crisping.
Don’t skip garlic butter basting steps for juicy, flavorful chicken.
Let chicken rest before serving so juices redistribute.
Save leftover garlic butter for dipping.
Double the batch since these reheat well and disappear fast.
Season drumsticks up to 24 hours ahead, store covered in fridge, bring to room temp 20 minutes before baking.
- Prep Time: 10 minutes
- Cook Time: 45 minutes
- Category: Main Course
- Method: Baked
- Cuisine: Italian-American
Nutrition
- Serving Size: 2 drumsticks
- Calories: 485
- Sugar: 1g
- Sodium: 940mg
- Fat: 36g
- Saturated Fat: 16g
- Unsaturated Fat: 17g
- Trans Fat: 0.5g
- Carbohydrates: 3g
- Fiber: 0g
- Protein: 38g
- Cholesterol: 175mg
Ingredients You’ll Need
- 8 chicken drumsticks
- 1 tbsp olive oil or melted butter
- 2 tsp garlic powder
- 2 tsp onion powder
- 2 tsp salt
- 1 tsp paprika
- 1 tsp dried Italian herbs
- 1/2 tsp black pepper
- 1/2 cup unsalted butter
- 4 cloves fresh garlic, minced
- 2 tbsp fresh parsley, chopped
- 1 tbsp lemon juice
- 1/2 cup grated Parmesan cheese
Ingredient Notes
Leave the skin on the drumsticks for maximum flavor and crispiness. The skin protects the meat from drying out and gets wonderfully crispy in the oven. If you prefer skinless chicken for health reasons, this recipe still works but won’t be quite as juicy.
Fresh garlic makes a huge difference in the butter sauce compared to garlic powder. The minced cloves create a more complex, aromatic flavor. If you only have garlic powder, use 1 teaspoon in the sauce along with the fresh parsley.
Grate your Parmesan cheese fresh from a block rather than using the pre-grated kind. Freshly grated Parmesan melts better and has more flavor. The pre-grated stuff contains anti-caking agents that prevent smooth melting.
Step-by-Step Instructions
Step 1: Prep and Preheat
Preheat your oven to 400°F and line a large baking sheet with aluminum foil. If you have a wire cooling rack, place it on top of the baking sheet for even crispier skin. Pat the chicken drumsticks completely dry with paper towels to help them crisp up.
Step 2: Season the Drumsticks
Mix garlic powder, onion powder, salt, paprika, Italian herbs, and black pepper in a large bowl. Drizzle the drumsticks with olive oil or melted butter, then toss them in the seasoning mixture until evenly coated. Make sure every inch of skin gets covered for maximum flavor.
Step 3: Arrange on Baking Sheet
Arrange the seasoned drumsticks on the prepared baking sheet, leaving space between each one. Don’t let them touch or they’ll steam instead of crisp. If using a wire rack, this step is even easier since air circulates all around.
Step 4: Bake Until Almost Done
Bake for 35 minutes without opening the oven door. The drumsticks should be mostly cooked through and starting to brown. Resist the urge to check on them too early or you’ll lose heat.
Step 5: Make the Garlic Butter
While the chicken bakes, melt butter in a small saucepan over medium heat. Add minced garlic and sauté for 1 to 2 minutes until fragrant but not browned. Remove from heat and stir in chopped parsley and lemon juice.
Step 6: Brush and Finish
Remove the drumsticks from the oven and brush them generously with the garlic butter. Return to the oven and bake for 5 more minutes. Repeat this process one more time for extra flavor and moisture.
Step 7: Add Parmesan and Serve
Remove the drumsticks from the oven one final time and immediately sprinkle with grated Parmesan cheese while they’re still hot. The cheese will melt slightly and stick to the buttery skin. Let rest for 5 minutes before serving.
Pro Tips & Cooking Hacks
- Pat drumsticks completely dry for the crispiest skin possible
- Use a wire rack for maximum air circulation and even crisping
- Don’t skip the garlic butter basting steps for juicy, flavorful chicken
- Let the chicken rest before serving so juices redistribute
- Save any leftover garlic butter for dipping bread or vegetables
- Double the batch since these disappear fast and reheat well
Tips & Variations
Make it spicy by adding red pepper flakes or cayenne to the seasoning mix. A pinch goes a long way, so start small and add more if you want extra heat. Buffalo sauce mixed into the garlic butter creates a spicy-garlicky fusion that’s incredible.
Try this recipe with chicken wings or thighs for variety. Wings get extra crispy and work great as appetizers. Thighs are juicier and more forgiving if you accidentally overcook them. Adjust cooking time down for wings and up slightly for thighs.
Prep ahead by seasoning the drumsticks up to 24 hours in advance. Store them covered in the fridge until you’re ready to bake. This actually improves the flavor as the seasonings penetrate the meat. Just bring them to room temperature for 20 minutes before baking.
Serving Suggestions
Serve these drumsticks with classic comfort sides like mashed potatoes, mac and cheese, or coleslaw. The creamy sides balance the bold garlic parmesan flavors perfectly. Crispy french fries or roasted potatoes make kids especially happy.
For a lighter meal, pair with a big green salad and roasted vegetables like broccoli or Brussels sprouts. Corn on the cob and baked beans round out a barbecue-style spread. The garlic butter from the chicken can even double as a dipping sauce for your veggies.
Common Mistakes
- Not drying the drumsticks results in steamed, soggy skin
- Crowding the pan prevents proper air circulation and crisping
- Opening the oven too often drops the temperature and extends cooking time
- Skipping the garlic butter basting makes the chicken less flavorful and juicy
- Adding Parmesan too early causes it to burn instead of melt
- Not letting the chicken rest causes all the juices to run out

What to Serve With Garlic Parmesan Chicken Legs
These drumsticks work beautifully with Italian-inspired sides like garlic bread, Caesar salad, or pasta with marinara. The garlic and Parmesan flavors echo through the whole meal. A simple Caprese salad with fresh mozzarella and tomatoes adds freshness and color.
For a casual family dinner, serve with comfort food favorites like baked potatoes, green beans, or buttered corn. Rice pilaf or quinoa soaks up any extra garlic butter beautifully. The key is choosing sides that won’t compete with the bold chicken flavors but will complement them.
Frequently Asked Questions
Can I use chicken breasts instead of drumsticks?
Yes, but reduce the cooking time to about 25 minutes since breasts cook faster. Use a meat thermometer to check for 165°F internal temperature to avoid drying them out.
How do I get the skin extra crispy?
Make sure to pat the drumsticks completely dry and use a wire rack if possible. You can also broil them for 2 to 3 minutes at the very end for maximum crispiness.
Can I make these in an air fryer?
Absolutely! Cook at 390°F for 20 minutes, flipping halfway through. Brush with garlic butter and add Parmesan during the last 3 minutes of cooking.
How do I store leftovers?
Store cooled drumsticks in an airtight container in the fridge for up to 3 days. Reheat in the oven at 350°F for about 10 minutes to maintain crispiness.
Can I freeze these drumsticks?
Yes, cooked drumsticks freeze well for up to 3 months. Thaw in the fridge overnight and reheat in the oven until warmed through and crispy again.
💬 Tried this recipe? Leave a comment and rating below!