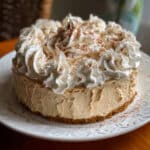
Peanut Butter Mousse Filling is about to become your secret weapon for show-stopping desserts with minimal effort. Imagine a cloud-like, silky smooth peanut butter cream that’s rich enough to satisfy any sweet tooth but light enough to keep you coming back for more.
I first made this mousse filling for my daughter’s birthday cake, and it was such a hit that guests were literally scraping their plates clean—one friend even texted me the next day asking for the recipe! Whether you’re filling a layer cake, piping into cupcakes, or creating elegant parfaits for a holiday gathering, this five-ingredient wonder comes together in just 15 minutes with no baking required.

Why You’ll Love This Recipe
- Lightning-fast prep – Ready in just 15 minutes with only 5 basic ingredients you probably have in your pantry
- No-bake perfection – No oven needed, making it ideal for hot summer days or when your oven is already occupied
- Versatile and crowd-pleasing – Works beautifully as cake filling, cupcake stuffing, pie topping, or even a fruit dip for parties
- Allergen-friendly options – Easy to adapt for different dietary needs with simple ingredient swaps
- Make-ahead friendly – Prepare up to 2 days in advance and store in the fridge until you need it
- Light yet indulgent – The whipped cream base keeps it airy while the peanut butter delivers rich, satisfying flavor
- Kid-approved – Combines classic peanut butter taste with a fun, fluffy texture that children and adults both adore
Equipment Needed
- Large mixing bowl (chilled in freezer for 10-15 minutes before use)
- Medium mixing bowl
- Electric hand mixer or stand mixer with whisk attachment
- Rubber spatula for folding
- Measuring cups and spoons
- Plastic wrap or airtight container for storage
- Piping bag with decorative tip (optional, for filling cupcakes or decorating)
Peanut Butter Mousse Filling
- Total Time: 45 minutes
Description
Easy 5-ingredient Peanut Butter Mousse Filling recipe ready in 15 minutes! Light, fluffy, no-bake filling perfect for cakes, cupcakes & parfaits. Make-ahead friendly!
Ingredients
Main Ingredients:
- 1 cup heavy whipping cream (cold, straight from the fridge)
- ¾ cup creamy peanut butter (smooth, well-stirred; not natural/separated kind)
- ½ cup powdered sugar (also called confectioners’ sugar)
- 1 teaspoon vanilla extract
- 1 pinch salt (optional, enhances peanut butter flavor)
Optional Add-ins:
- ⅓ cup mini chocolate chips or chocolate shavings
- 2 oz melted chocolate for marbling
- 1–2 tablespoons honey or maple syrup (for extra sweetness)
Instructions
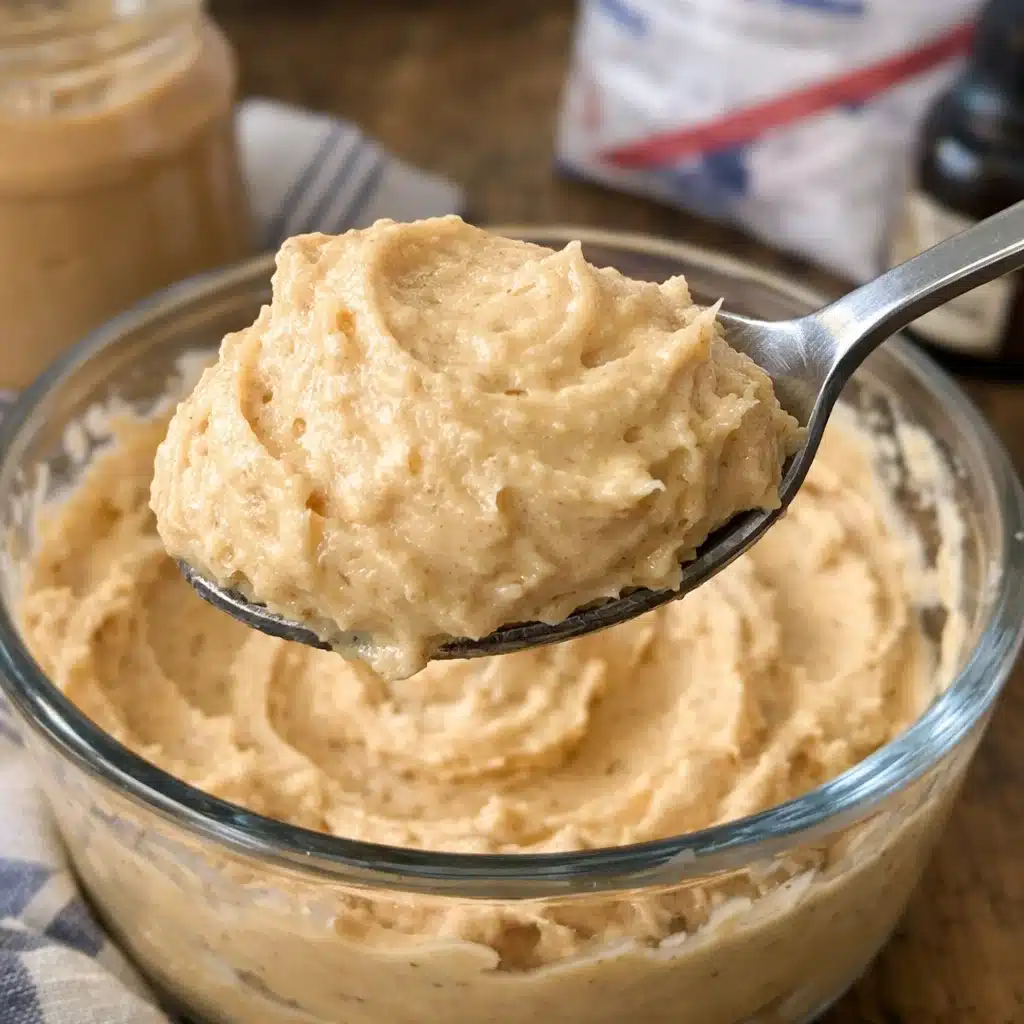
Place the cold heavy whipping cream in your chilled mixing bowl. Using an electric mixer on medium-high speed, beat the cream for 2-3 minutes until soft peaks form. Soft peaks should curl over gently when you lift the beaters.
In a separate medium bowl, combine the peanut butter, powdered sugar, vanilla extract, and pinch of salt (if using). Stir vigorously with a spoon or spatula until the mixture is completely smooth and creamy with no lumps.
Add about one-third of the whipped cream to the peanut butter mixture. Gently fold together using a rubber spatula, making broad sweeping motions from the bottom of the bowl up and over. This initial addition lightens the dense peanut butter base. Add the remaining whipped cream in two more batches, folding gently each time.
Taste your mousse and assess the texture. If you’d like it sweeter, gently fold in an additional 1-2 tablespoons of powdered sugar. If the mousse seems too thick or stiff, fold in 1-2 tablespoons of additional cold cream until you reach your desired consistency.
Transfer the mousse to an airtight container or cover the bowl tightly with plastic wrap. Refrigerate for at least 30 minutes before using—this allows the mousse to firm up and the flavors to meld together. For best texture, use within 24 hours, though it will keep for up to 3 days refrigerated.
Notes
- Don’t skip the folding technique: Beating or stirring vigorously will deflate all those precious air bubbles. Use a gentle hand and a “cut, scoop, turn” folding motion.
- Room temperature peanut butter: If your peanut butter is cold and stiff from the pantry, microwave it for 10-15 seconds to soften slightly. This makes mixing easier and prevents lumps.
- Avoid over-whipping: Stop beating the cream at soft peaks. Over-whipped cream becomes grainy and can separate when folded into the peanut butter.
- Stabilize for hot weather: If serving the mousse in warm conditions, add 1 tablespoon of cream cheese to the peanut butter mixture for extra stability.
- Pipe like a pro: Transfer mousse to a piping bag fitted with a large round or star tip for beautiful, professional-looking cupcake fillings or decorations.
- Prep Time: 15 minutes
- Cook Time: Chill Time: 30 minutes
- Category: Dessert
- Method: No-bake
- Cuisine: American
Nutrition
- Calories: 245
- Sugar: 12g
- Sodium: 115mg
- Fat: 20g
- Saturated Fat: 8g
- Unsaturated Fat: 11g
- Trans Fat: 0g
- Carbohydrates: 14g
- Fiber: 1g
- Protein: 5g
- Cholesterol: 41mg
Ingredients You’ll Need
Main Ingredients:
- 1 cup heavy whipping cream (cold, straight from the fridge)
- ¾ cup creamy peanut butter (smooth, well-stirred; not natural/separated kind)
- ½ cup powdered sugar (also called confectioners’ sugar)
- 1 teaspoon vanilla extract
- 1 pinch salt (optional, enhances peanut butter flavor)
Optional Add-ins:
- ⅓ cup mini chocolate chips or chocolate shavings
- 2 oz melted chocolate for marbling
- 1-2 tablespoons honey or maple syrup (for extra sweetness)
Ingredient Notes
- Peanut butter: Use full-fat, creamy peanut butter like Jif or Skippy for best results. Natural peanut butter with separated oils can make the mousse grainy and unstable. If you only have natural PB, stir it extremely well and consider adding an extra tablespoon of powdered sugar for stability.
- Heavy whipping cream: Must be cold (below 40°F) for proper whipping. The higher fat content (36-40%) is essential for stable peaks. Half-and-half or light cream won’t work as substitutes.
- Powdered sugar: The cornstarch in powdered sugar helps stabilize the mousse. Granulated sugar won’t dissolve properly and will leave a grainy texture.
- Vanilla extract: Pure vanilla extract gives the best flavor, but imitation vanilla works in a pinch.
- Chocolate options: Use mini chips rather than regular-sized—they distribute better and won’t weigh down the mousse. For melted chocolate, semi-sweet or dark chocolate complements peanut butter beautifully.
- Substitutions: For nut-free version, use sunflower seed butter or cookie butter. For dairy-free, use coconut cream (chilled overnight, use only the solid part).
Step-by-Step Instructions
Step 1: Whip the Heavy Cream
Place the cold heavy whipping cream in your chilled mixing bowl. Using an electric mixer on medium-high speed, beat the cream for 2-3 minutes until soft peaks form. Soft peaks should curl over gently when you lift the beaters.
Step 2: Prepare the Peanut Butter Base
In a separate medium bowl, combine the peanut butter, powdered sugar, vanilla extract, and pinch of salt (if using). Stir vigorously with a spoon or spatula until the mixture is completely smooth and creamy with no lumps.
Step 3: Fold in the Whipped Cream
Add about one-third of the whipped cream to the peanut butter mixture. Gently fold together using a rubber spatula, making broad sweeping motions from the bottom of the bowl up and over. This initial addition lightens the dense peanut butter base. Add the remaining whipped cream in two more batches, folding gently each time.
Step 4: Adjust Sweetness and Consistency
Taste your mousse and assess the texture. If you’d like it sweeter, gently fold in an additional 1-2 tablespoons of powdered sugar. If the mousse seems too thick or stiff, fold in 1-2 tablespoons of additional cold cream until you reach your desired consistency.
Step 5: Chill and Set
Transfer the mousse to an airtight container or cover the bowl tightly with plastic wrap. Refrigerate for at least 30 minutes before using—this allows the mousse to firm up and the flavors to meld together. For best texture, use within 24 hours, though it will keep for up to 3 days refrigerated.
Pro Tips & Cooking Hacks
- Chill everything: Put your mixing bowl, beaters, and even the heavy cream in the freezer for 10-15 minutes before starting. Cold equipment whips cream faster and creates more stable peaks.
- Don’t skip the folding technique: Beating or stirring vigorously will deflate all those precious air bubbles. Use a gentle hand and a “cut, scoop, turn” folding motion.
- Room temperature peanut butter: If your peanut butter is cold and stiff from the pantry, microwave it for 10-15 seconds to soften slightly. This makes mixing easier and prevents lumps.
- Avoid over-whipping: Stop beating the cream at soft peaks. Over-whipped cream becomes grainy and can separate when folded into the peanut butter.
- Stabilize for hot weather: If serving the mousse in warm conditions, add 1 tablespoon of cream cheese to the peanut butter mixture for extra stability.
- Pipe like a pro: Transfer mousse to a piping bag fitted with a large round or star tip for beautiful, professional-looking cupcake fillings or decorations.
- Chocolate swirl technique: Drizzle melted chocolate over the finished mousse and gently swirl with a butter knife for a gorgeous marbled effect. Don’t overmix or you’ll lose the visual appeal.
- Taste as you go: Peanut butter brands vary in saltiness and sweetness, so adjust sugar and salt to your preference.
- Make it extra fluffy: For an even lighter texture, increase the cream to 1¼ cups, but note this will make a larger batch.
Tips & Variations
Storage:
- Refrigerate in an airtight container for up to 3 days
- The mousse can separate slightly after 24 hours; simply stir gently before using
- Not recommended for freezing as the texture becomes grainy when thawed
- If making cake layers, assemble and refrigerate the entire cake to help the mousse set firmly
Make-Ahead:
- Prepare the mousse up to 2 days in advance and store covered in the refrigerator
- If it seems loose after refrigeration, fold in a few tablespoons of freshly whipped cream to refresh the texture
- Fill cakes or cupcakes the day before serving for best results
Dietary Variations:
- Gluten-free: This recipe is naturally gluten-free—just verify your powdered sugar doesn’t contain wheat-based additives
- Dairy-free: Replace heavy cream with full-fat coconut cream (refrigerate can overnight, use only the thick solid portion)
- Nut-free: Substitute sunflower seed butter, Wow Butter, or cookie butter for peanut butter
- Lower sugar: Reduce powdered sugar to ⅓ cup or use powdered erythritol for a sugar-free version
- Vegan: Use coconut cream plus vegan cream cheese for stability, and ensure your peanut butter is vegan
Flavor Twists:
- Add 2 tablespoons cocoa powder for chocolate peanut butter mousse
- Stir in ¼ cup crushed pretzels for sweet-and-salty crunch
- Mix in 2 tablespoons peanut butter powder for more intense PB flavor
- Add ½ teaspoon cinnamon for a warm spice note
- Fold in chopped Reese’s Peanut Butter Cups for extra indulgence
Serving Suggestions
This peanut butter mousse filling shines in so many applications that you’ll find yourself making it on repeat. Use it as a luscious filling between chocolate cake layers, pipe it into the center of chocolate or vanilla cupcakes, or spread it between graham crackers for easy no-bake sandwich cookies.
For an elegant dessert, layer the mousse with fresh sliced strawberries, bananas, or raspberries in parfait glasses, then top with a drizzle of chocolate sauce and crushed peanuts.
It also makes an incredible dip for apple slices, pretzels, graham crackers, or Nilla wafers at parties—just serve it in a bowl surrounded by your favorite dippers. For a show-stopping pie, spread this mousse into a prepared chocolate cookie crust, chill until set, and top with whipped cream and chocolate shavings.
The light, creamy texture pairs beautifully with the richness of brownies or chocolate chip cookies as a frosting alternative that won’t weigh down your baked goods.
Common Mistakes
- Using natural peanut butter: The separated oils in natural peanut butter create a greasy, unstable mousse that won’t hold its shape. Stick with conventional creamy peanut butter like Jif or Skippy.
- Warm cream: If your cream isn’t cold enough, it won’t whip properly and you’ll end up with a soupy, loose mousse that won’t set.
- Over-mixing after adding cream: Vigorous stirring or continued beating deflates the whipped cream, resulting in a dense, heavy filling instead of a light mousse.
- Skipping the chilling time: The mousse needs at least 30 minutes to firm up in the refrigerator. Using it immediately means it won’t hold its shape and may ooze out of cakes or cupcakes.
- Adding mix-ins too early: Fold in chocolate chips, crushed cookies, or other add-ins at the very end, just before chilling, to prevent them from sinking to the bottom.
- Not tasting before finishing: Peanut butter brands have different salt and sugar levels, so always taste and adjust sweetness before the final chill.
- Using a bowl that’s too small: The whipped cream increases significantly in volume, so make sure your bowl is large enough to accommodate folding without spilling over the sides.
What to Serve With Peanut Butter Mousse Filling
This versatile mousse pairs beautifully with rich chocolate desserts—think devil’s food cake, chocolate cupcakes, or fudgy brownies where the peanut butter cuts through the cocoa intensity. It’s also fantastic with vanilla or banana cake for a more subtle pairing that lets the peanut butter shine, or layered in parfaits with sliced bananas, fresh strawberries, and a drizzle of caramel sauce for an easy no-bake dessert.
For casual gatherings, serve it as a dip alongside graham crackers, apple slices, pretzels, and shortbread cookies—the sweet-salty combination is absolutely addictive and perfect for game day or movie night spreads.
Frequently Asked Questions
Can I use natural peanut butter instead of regular?
Natural peanut butter is not recommended for this recipe because the separated oils create an unstable, greasy texture that won’t hold up as a mousse. The emulsifiers in regular creamy peanut butter (brands like Jif, Skippy, or Peter Pan) are essential for achieving the smooth, stable consistency you need. If you must use natural PB, stir it extremely well, refrigerate until firm, and add an extra 2-3 tablespoons of powdered sugar to help stabilize the mixture.
How long does peanut butter mousse filling last in the refrigerator?
The mousse will keep in an airtight container in the refrigerator for up to 3 days. However, for best texture and flavor, it’s ideal to use it within 24 hours. After the first day, the mousse may separate slightly—simply give it a gentle stir before using. If you’ve already filled a cake or cupcakes, the assembled dessert will stay fresh for 2-3 days when properly refrigerated.
Can I freeze peanut butter mousse filling?
Freezing is not recommended as the texture changes significantly when thawed—the mousse becomes grainy and separated, and the whipped cream breaks down. However, if you’ve already assembled a cake or cupcakes with the mousse filling, you can freeze the entire dessert for up to 1 month. Thaw overnight in the refrigerator, though the texture will be slightly denser than fresh.
Why did my mousse turn out runny?
A runny mousse typically results from cream that wasn’t whipped enough (should reach soft peaks), cream that wasn’t cold enough to whip properly, or over-mixing when folding the whipped cream into the peanut butter base, which deflates the air bubbles. To fix runny mousse, refrigerate it for 1-2 hours to firm up, or fold in 2-3 tablespoons of freshly whipped cream to add more structure. For future batches, make sure your cream, bowl, and beaters are all well-chilled.
Can I make this mousse dairy-free or vegan?
Yes! Replace the heavy whipping cream with full-fat coconut cream that’s been refrigerated overnight. Open the can without shaking it, scoop out only the thick solid cream on top (save the liquid for smoothies), and whip it just like regular cream. You may need to add 1-2 tablespoons of powdered sugar to help stabilize the coconut cream. The result will have a subtle coconut flavor that pairs surprisingly well with peanut butter, though you can also use it with dairy-free cream cheese for a more neutral taste.
💬 Tried this recipe? Leave a comment and rating below! Share your favorite way to use this peanut butter mousse filling